|
<< Click to Display Table of Contents >> NShape Basic Tutorial Basic Tutorial: Templates |
  
|
|
<< Click to Display Table of Contents >> NShape Basic Tutorial Basic Tutorial: Templates |
  
|
In this step you will learn what templates are, how you can create and employ them.
Templates are such an important concept in NShape that it is quite astonishing we came so far without using them. Templates might even be the most essential concept because they underline the fact that NShape distinguishes properly between the presentation aspect and the logical aspect. In tutorial we represent web pages through ellipses, where web pages are the logical aspect and the ellipses the presentational aspect. In an application that deals with web statistics, the logical aspect is very unlikely to change but the presentational aspect might be modified easily and frequently. Why not display web pages as circles or rounded rectangles for instance?
Templates are the link between these two aspects. Currently it would be relatively hard to exchange the ellipses by rounded rectangles once the diagram has been created. The reason is, that we have worked with physical shapes and not with the logical entities. A template assigns a presentation to a logical entity promotes all modifications of the presentation for this logical entity immediately to all its instances.
To be more concrete, a template has a name (e.g. "web page") and shape (e.g. a blue ellipse) and some other things that are important for the model binding, which we cannot talk about here. When a template is inserted in a diagram, the visible shape keeps its link to the template and will adjust to certain modifications of the template immediately. The user changes the color of the web page to green, all web page shapes will become green. He defines a thicker border, all web page shapes get a thicker border as well. He replaces the ellipse by a rounded rectangle, the web page shapes will no look very differently. From some point of view there is similarity with styles but a template contains all aspects of a shape not only one. And templates are categorized after the logical aspects not after the presentational ones.
Let's see how it is done. When the project is loaded, WebVisits will create a template for the logical entity web page and create the shapes from that template.
| 1. | Add the following code in Form1_Load immediately after the code for the style modification: |
// Create a template for web pages |
| 2. | When the creating the shapes we retrieve the template from the repository. Insert this code in fileLoadStatisticsToolStripMenuItem_Click after the diagram creation: |
Template webPageTemplate = project1.Repository.GetTemplate("Web Page"); |
| 3. | Use this code instead of the existing one for the creation of the shapes in fileLoadStatisticsToolStripMenuItem_Click: |
referringShape = (RectangleBase)webPageTemplate.CreateShape(); |
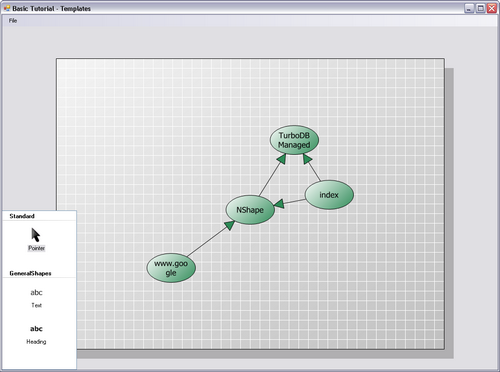
| 4. | Run the application and check that the web pages are now displayed in green. |
You may also notice that the toolbox now contains a Web Page item, from which you can also insert new shapes into the diagram. It would be easily possible to attach a template editor to the toolbox, which would allow to modify this template and thereby all Web Page shapes in the diagram.
But for now, we do not want to extend the possibilities of the WebVisits app but to restrict them. It is not the intention of the program to draw whatever the user wants into those visualizing diagrams. In fact, the only thing we want to be added by the user are additional headers and remarks. Therefore all other toolbox items must be removed.
Before you can eliminate them, you must first learn how they got there in the beginning. By default, the ToolSetController creates a template for each shape type in the loaded libraries. For each template, it creates a toolbox item with the insertion tool. If you want to reduce the items in the toolbox, you must first disable the automatic creation of tools and then add the desired tools explicitly.
| 1. | Disable automatic template generation before the project is created: |
project1.AutoGenerateTemplates = false; |
| 2. | Create a template for annotions after the template for web pages has been added: |
Template textTemplate = new Template("Text", project1.ShapeTypes["Text"].CreateInstance()); |
| 3. | Create a template for headings after the template for annotations: |
Template headingTemplate = new Template("Heading", project1.ShapeTypes["Text"].CreateInstance()); |
| 4. | Run the application and check that only three templates (and the pointer tool) are displayed in the toolbox. |
But wait, we do not want the web page template to be available in the toolbox. The user could insert additional web pages and tamper with the statistics. You therefore must also prohibit the automatic tool creation for each template and add the desired tools through code into the toolbox.
| 1. | Remove the insertion tool for the web page template from the toolbox after all templates are created: |
toolSetController1.DeleteTool(toolSetController1.FindTool(webPageTemplate)); |
| 2. | Run the application and check that only three tools and two templates are left in the toolbox. |

Insertion tools are created automatically for each template in the project.
Tutorial Navigation